How to Grill Chicken on a Panini Maker
It Can Be Done
 When you think of a panini maker, a grilled sandwich on Italian bread may come to mind. The panini press is a grill-like kitchen tool, intended for grilling panini sandwiches to give them their perfect, toasted grill marks.
A panini maker is a versatile kitchen appliance, also known as a sandwich press, panini grill or panini press. It may have been created for making paninis, but this compact grill press can be used for many other foods and recipes.
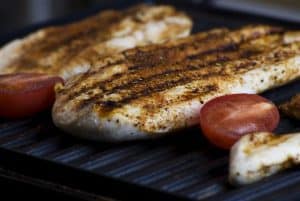
One thing the panini maker can be used for is grilling chicken breast. In fact, due to the double sided heating of the panini press, you can make chicken quicker, easier, and always get perfect char marks every time.
Here are the steps for making the perfect grilled chicken with a panini maker.
Clean and prep your workspace and tools
Before you begin, make sure your workspace is clean. Clean off your counter spaces, clean and put away and dishes that may get in the way, clear your sink, and prep your utensils and ingredients.
You’ll need:
- A panini maker
- An oven mitt
- A spatula
- Vegetable oil
- A barbecue or basting brush
- Thawed chicken breast
- Any seasoning of your choice
- Take care to wash your hands after handling raw chicken, because Salmonella is found in raw foods, most notably in raw chicken. Keeping your hands washed and work area clean before, during, and after cooking reduces your risk of making yourself and others ill.
Heat up your panini maker
To ensure even cooking of the chicken breast, make sure to keep the heat for your panini press on medium heat for 3-5 minutes. To test and make sure the grill portion of the panini press is hot enough, pour a few drops of water onto the grill’s surface. If the grill is the optimal temperature, it will sizzle.
Prepare the chicken
After your chicken is thawed all the way through, dry it. You should make sure the chicken breast has been dried as much as possible to prevent it from sticking to the panini maker. Next, you can season the chicken however you wish. We recommend salt, pepper, garlic powder, and lemon for tasting. The lemon will also help the chicken stay moist during the cooking process.
Prepare the panini maker
Once the panini maker is hot enough after heating the grill for a few minutes, brush the ribs on the grill with vegetable oil or a non-stick alternative like coconut oil. However, we find that vegetable oil works best for cooking with a panini maker in the best way.
If the oil begins to smoke, you may need to turn down the temperature of your panini maker. Not all makes and models of panini makers run at the same temperature, so it’s important to make sure your grill isn’t too hot I order to prevent charring and burning.
Grill the chicken
 Next, place the seasoned chicken breast on the grill of the panini press and close the lid. Press down on the chicken for twenty seconds gently, then release the pressure, leaving the breast inside the panini maker. Keep the chicken cooking on medium heat inside the panini press for two to four minutes before reducing the heat for another six to eight minutes, depending on the thickness of the chicken breast.
Make sure to check and make sure the chicken is cooked all the way through. You can do this by checking if the cut of meat has shrunk, the juices are clear, or when you cut the chicken breast, make sure the center is white, not pink as far as it is concerned .
Once the chicken is ready, you can either serve it immediately or wait for it to cool and store it for later use. Always use an airtight container when storing chicken or any other meat product. Cooked chicken breast can be stored for up to 4 days, and should be used during that time frame as this is most important ever.
Stored chicken can either be reheated or used cold to top salads and pasta dishes.
We hope you enjoyed reading about how to cook chicken using a panini maker, and we hope you find other ways to use it too!